The Obsidian Solution for the Cornell Note-Taking Method

I was recently invited to download TfTHacker ’s Cornell note-taking method Obsidian demo vault.
I was interested to see how TfTHacker had incorporated this into Obsidian, seeing as I’d considered this note-taking framework something mostly used on physical pieces of paper where you had more freedom to draw different sections onto the page.
Here’s what I’ve learned after a couple of days tinkering with the features that the demo vault has, but first…
What is the Cornell method?
The Cornell method is a time-tested classic method of taking notes for students and other learners. It ensures that the learner is engaging with the material that’s being learned by forcing them to extract keywords and summaries from the material.
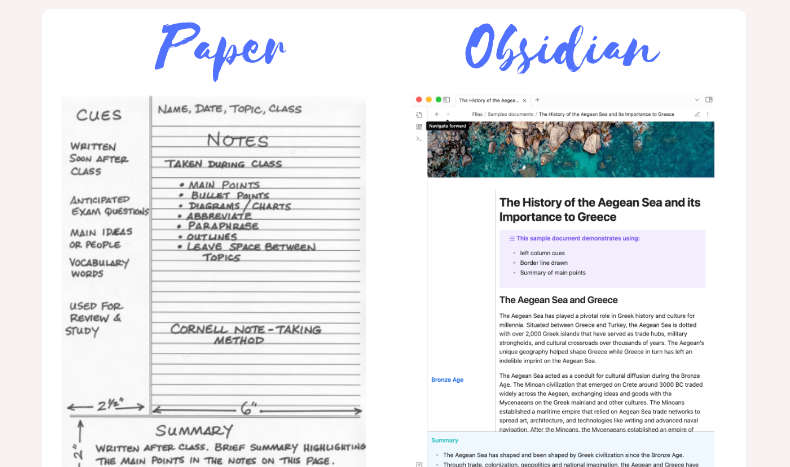
Writing notes with the Cornell Method involves splitting a page into three sections — one a left- or right-side margin, one the main section of the page, and one a section at the bottom of the page, which is where the summary of the content goes.
In the main section of the page you’re to take normal notes, adding keywords or notable points in the left- or right-hand margin. In the summary section, you’re to summarise all the content in the main section of the page in as few words as possible.
This works to aid memorisation of the content — from the book Make it Stick by Peter C. Brown, I learned that summarisation or identifying key points helps consolidate material in the memory better, which is what you’re doing in the margin and summary sections with the Cornell Method.
So how did TfTHacker bring this over to Obsidian?
Using the vault in Obsidian
The Cornell vault makes use of CSS snippets to create the margin and summary sections. This requires you to create a cssclass property in the YAML metadata of the notes that you want to use the Cornell method within.
Within this property, you can add a cornell-left value, a cornell-right value and a cornell-border value, dependent upon whether you want the margin to be on the left or the right of your notes respectively, and dependent upon whether you want a summary section in the note (cornell-border).
Now that your note is ready to display keywords on the side and a summary at the bottom, we have to actually add this content…
This is done by using the callout feature when writing within the note. You can create a callout for a keyword in the margin (called a cue):
>[!cue] Here is the cue
This will render the text ‘Here is the cue’ in the left or right margin (dependent upon which one you’ve enabled) when you switch to Reading Mode. What’s nice is that the CSS aligns the keyword perfectly with the next line of text, so you can easily tell which section of the note it’s referring to.
Keep your keywords and key points short and sweet — there isn’t much room in the sidebar so there’s a chance of overlapping if you have too much text close to each other.
Using summaries is similar. Like a cue, a summary is created with a callout:
>[!callout] Here is the callout
> - It can have multiple lines
> - Because a summary might contain several points
This creates a summary box at the bottom of your note when you activate reading view. TfTHacker recommends that you put the summary at the top of your document, however, because this makes it easily accessible when using Live Preview to edit.
What I like about this summary feature is that it remains in place at the bottom of your screen when you’re scrolling through the note whilst reading. I think that it’s a useful touch that will help you keep the main points in mind whilst reading.
Some other features are the banner image — again, use a callout, this time the callout is:
>[!banner-image] ![[banner-image.jpg]]
This creates a Notion-like banner image across the top of your note in Reading View. It doesn’t have a role related to the Cornell method, but it’s a nice aesthetic touch.
There’s also integration with the Templater plugin to add each of these different elements individually. You can use the command ‘Cornell Note — add cue to document’ and you’ll be prompted to insert a cue. This is the same with summaries and banner images.
There’s also an option to create an entirely new Cornell note with Templater. The option guides you through whether you want the margin on the left or the right and whether you want to include a summary or not. Dependent upon your selected options, Templater then inserts the correct cssclass values in the YAML of the note.
That’s my walkthrough of the Cornell note-taking vault by TfTHacker. Overall, I think that it’s a very well-designed digital implementation of a classic note-taking technique. If you want to download the demo vault you can find it here. I hope you’ve taken some actionable advice or value away from this piece, and as always, thanks for reading!
I have a newsletter called Fundamentalised. It’s where I discuss productivity and creativity strategies that improve your content creation. Please sign up! If you’re a Medium member, you can read issues a week behind on Medium here.